• Welcome to the new NAXJA Forum! If your password does not work, please use "Forgot your password?" link on the log-in page. Please feel free to reach out to [email protected] if we can provide any assistance.

RE 2 inch lift kit question

Alpine Jim

NAXJA Forum User
Location
Longmont, CO
This is a follow-up to my post the other day about 2 inch kits. As i said I am thinking of the Rubicon Express 2 inch kit with the AAL. Mostly because I cannot see spending 4x as much for a 3-3.5 incher based on my needs.

I THOUGHT I had seen reference in my research to the idea that I should make sure to get the RE kit that has the full length AAL as opposed to a 1/2 or 3/4 length, and I THOUGHT those comments were in reference to the RE6160 kit.

In any case, the folks at QuadraTec are telling me that the AAL with this kit is not full length, and indeed you can see this in the Install instructions which you can download off their website.

So - can anyone tell me if a full-length leaf is available for this? Maybe the comments I saw were just general comments and not about the RE kit specifically?

The way I was reading these comments is that a full length AAL is going to be better than a shorter one from both a ride persepctive and maybe from a 'won't destroy the stock springs as fast' perspective.

I havent called RE directly yet but may do that if no-one knows what the heck I am talking about.

Also, for a little laugh check out this comment from the QuadraTec rep:
Rep: Hello. Welcome to the Quadratec Live Chat Service. How may I assist you?
Jim: Hi. I am looking at the 2 inch lift for my 99 Cherokee, kit # RE6160. My question : Is the AAL a full length, a3/4 length, or a 1/2 length spring?
Rep: A great question, one moment while I research this for you
Jim: ok
Rep:: I can tell you for sure that the add a leaf option is not full size.
Rep: If you look at the instructions linked out our site, the second page as an image that will give you a vague idea of size.
Rep: Is there anything else I can help you with today?
Jim: Hmm ok. I have seen reference in Cherokee forums that I can order the kit with the full length spring. Like perhaps it is an option or something. How do i do that? I will take a look at the Instructions.
Rep: One moment while I look into finding a kit for you that will suite your needs
Rep: *suit
Jim: :)
Rep: These are meant to work with your existing leaf springs to give you added height
Rep: Just FYI. Are you looking for a replacement leaf spring kit?
Jim: Not at this time - too much extra expense. Unless you have a 2 inch full leaf spring kit.
Rep: I will look for you - one moment please.
Rep: Unfortunately you would have to buy them individually.
Rep: Is there anything else I can help you with today?
Jim: Nope. Thanks for your help.
Rep: You're welcome

Well no duh! Why do you think I am wanting a lift kit?About fell about of my chair laughing at that one. (I took the reps actual name out).

Anyway, what about the full-length AAL spring?
 
The RE BB kit does not come with a full-length AAL. The full length will give more lift than the shorter AAL. The AAL in the kit fits between the lower overload and the rest of the pack. I was worried that my 215K mile stock rears would be sagging too much for the half-length AAL, but it sits perfectly level. When I first installed it, the rear was about 1" high, but it settled nicely. As for the ride, I really can't tell that it rides any different than before the lift.
 
Exactly the kind of info I was looking for Diesel. Thanks. That is what I was worried about also. Since you just did yours (per the other thread) and it went well, I am feelng better about trying it.
 
I have almost 3K miles on it already. I really like the way it sits on the 235's. When you get your rear leaf pack apart, clean the rust and scale off with a wire brush. Then put some grease on each end of the AAL (about 4-5" or so) and on the overload as well. Also note that the AAL has an offset and the longer part goes towards the rear - instructions don't tell you that and if you don't pay attention (like I did on my first one) then they don't sit right.

On the front, unbolt your calipers and hang them off to the side, and unbolt your track bar and your sway bar end links. To make it super easy, unbolt the axle end of your lower control arm. That makes it much easier to get the springs in and out.
 
Thanks for the advice.

On the front, did you use coil spring compressors and still wanted the extra space made by unbolting things, or did you not use compressors at all and that is why you recommend unbolting things?
 
Thanks for the advice.

On the front, did you use coil spring compressors and still wanted the extra space made by unbolting things, or did you not use compressors at all and that is why you recommend unbolting things?

Didn't use the spring compressor. I was replacing most of the other bushings anyway so I had it all apart. I still think it is easier to unbolt and let it droop, but that is just my twisted opinion.
 
If you disco the axle side track bar mount, it will definitely help. Same with the shocks.
 
God news -my lift arrived today!

But now I have bad news too - I started spraying the U-bolts, shock bolts, etc down earlier this week and today when doing so, noticed that my right front bumpstop has fallen apart. The rubber part is just laying there at the bottom, inside the coil. So obviously I want to replace them as I do the lift.

Questions:
-with the 2 inch RE lift with shocks, should I look for extended bumpstops or just purchase stock ones?

-I keep hearing about 'isolators' but cannot even figure out what they are, whether I have them or need them, and where they go?

Thanks for all the help...
 
The coil spring isolators are those small black rubber apparati that are in between the coil springs and the body. IF you think they will fit back in the location, pick up some extended stock style bumpstops. Or, you would pribably be fine with stacking 3 or 4 hockey pucks RTV'd together in each coil bucket.
 
God news -my lift arrived today!

But now I have bad news too - I started spraying the U-bolts, shock bolts, etc down earlier this week and today when doing so, noticed that my right front bumpstop has fallen apart. The rubber part is just laying there at the bottom, inside the coil. So obviously I want to replace them as I do the lift.

Questions:
-with the 2 inch RE lift with shocks, should I look for extended bumpstops or just purchase stock ones?

-I keep hearing about 'isolators' but cannot even figure out what they are, whether I have them or need them, and where they go?

Thanks for all the help...

Stock bumpstops are fine. I went with poly replacements just because. They were extended, but I cut them down to roughly stock length. The shocks are a great fit and will allow the front to fully cycle, so there is no reason to go to an extended bump.

As JW said, the isolators are on top of the spring, between the spring and body. Pull them off, put in the spacer, then slide the isolator back in. The isolator will go between the spring and the spacer.
 
Progress update: Still waiting for my bumpstops to arrive but they should be in today.


I mostly completed the back end this weekend. Just need to bleed the brakes and do the final on-the-ground torqueing. So far no problems at all - my XJ is pretty clean as far as rust is concerned so didn't break anything taking it apart.


Upon re-assembly, I came up on these questions:


The shocks included in the RE 6160 kit came with small metal sleeves/cylinders that I assume are supposed to go with the bushings at the bottom of the rear shocks somehow. The instructions do not say anything about them. I thought maybe they went inside the lower mount (on the rear) but they do not fit over the stud that sticks out from the axle. Also the old shocks do not have anything there – they were just straight stud-to-rubber without any additional sleeving. I guess I just leave them out and figure they were for some other application that has a smaller stud?


Shock mount torque specs - from what I see on-line the specs are 16 and 17lb-ft for the lower rear nut and upper rear bolts. Doesn’t seem like very much??


Speaking of torqueing things – I know that all suspension connectors should be torqued once on the ground – this is for connections with rubber or poly bushings, right? but U-Bolts can have the final torque while on the jackstands? (While we are at it, what about the re-torque after driving it a 100-200 miles? On the ground or on jackstands or does it matter?)


Upon getting the back end back down on the ground – I have gained 5 inches! This is a 2 inch lift! I know it will settle but 3 inches worth? I was at 16.5 and now am at 21.5.

For those who are considering this lift and wondering about any ‘hidden” costs – here is where I am at so far:

Rubicon Express 2inch BB: $260
New U-bolts/nuts/washers: $50 (I got these from Denver Spring – what a good experience. These folks are fast and friendly. I took one of my old ones in and they bent up four new ones with an extra inch on them in less than ten minutes while I waited. The price included four new spring clamps as well.
New bump stops up front (one was completely broken off): $17
2 new 6 inch clamps to hold the pack together during disassembly/assembly (I only had one 5 incher): $32
1 new deep well, ½ inch drive, ¾ inch socket (the u-bolts are just a little long for my regular length socket to fit but not so long I need to cut them off; my choice was to cut them or buy a new socket as all I had in deep well was 3/8 inch drive. I decided on the socket): $10
Still to come: Alignment, possible SYE/DS (crossing my fingers to not need this but recognize I might, seems especially likely while sitting at 5 inches!) Oh, and one of the bolts on the bottom of one front shock rounded off a bit so plan to buy four new nuts/bolts as well.

Total so far: $327 (parts) + $32 (tools) = $359. I won’t count brake fluid or the new can of PB Blaster.
 
It will settle. Mine was way high also, but it settled right down.

Don't worry about the sleeves on the shocks - they are just extras as those shocks have other applications that need them.

Torque on the shock bolts seems right -they are small bolts.

U-bolts torquing while on jack stands is fine. When retorquing, on the ground is fine.
 
Nice!

I had a good experience with the fine people at Denver Spring and Suspension. I would have had a few more if they were open on Saturday.
 
So things are going slower than planned - everything is going together easily enough but I just don't have enough hours to get it done fast. Too many other "have-to's" on my plate. In case anyone is interested so far I have about 10-11 hours in, working entirely by myself. I tend to go slow and think about things quite a bit before proceeding - I am sure this could be done faster even considering working by yourself.

Back is done - just need to bleed the brakes.

Last night I had an extra hour so I got the coils, new spacers, and new shocks back in. But then I came to the sway bar.

With the off-set that the axle undergoes, the sway bar ends no longer line up with the links. Maybe 3/4 inch off or so. What is the solution here? Just pry really hard on the links (would they break?). Loosen up the sway bar bushings and try to slide it over a bit? I guess this is why adjustable track-bars exist huh?
 
With the off-set that the axle undergoes, the sway bar ends no longer line up with the links. Maybe 3/4 inch off or so. What is the solution here? Just pry really hard on the links (would they break?). Loosen up the sway bar bushings and try to slide it over a bit? I guess this is why adjustable track-bars exist huh?
Well, yes, to center the axle to the body after changing the ride height.

The easy way to get the track bar lined up to the holes is to put the tires on the ground and turn the steering wheel.
 
Thanks for the reply - but I may have been confusing in how I wrote the question.

The sway bar is what is no longer lined up to its links. I did not disconnect the track bar. I only mentioned the track bar because I assumed that was the "correct' way to resolve the sway bar not lining up.
 
Oooohhhhhhhhhhhhh, OK. :)

Yes, the lift pulls the axle off center. To retain the stock sway bar (and center the axle), you will have to drill a hole in the axle end bracket, about 3/4" to the driver side. That will get the axle (and sway bar) lined up.

FWIW, the months I ran the stock track bar, bolted in the stock location, the sway bar slid over far enough to reconnect. For street driving, that was OK.

It was not long before I had sway bar disconnects and an adjustable sway bar. I acquired both in the Colorado Chapter classifieds. :thumbup:
 
I was able to complete the lift install yesterday – insert smiley face here! I have driven it for maybe 15 miles so far and it feels really good. Some people complain about the ride quality on an AAL, but I just don’t see it. To me it feels great.

I guess I have maybe 13 hours into it, working on my own. (Yes I have friends J but my schedule often doesn’t allow for me to find them when I need them.)

I was able to get the sway bar attached without any issues once I jacked the front axle up, so I will go with that for now. But I have a few outstanding questions:

1) I know I should get an alignment done - how critical and necessary is this? Which angles get changed during a lift that the shop can partly or fully account for (toe-in, caster, camber)?

2) Last time I was in for an alignment about a year ago, the shop said that soon I would need an ‘off-set ball joint’ as one side was -.3 more than the other. They said that was within spec but at some point action would be needed. Would the lift make this problem better or worse?

3) They also said a year ago that they were starting to see a small amount of play in the track bar and steering stabilizer. I suppose any lay in the track bar would come from worn bushings right? There is nothing else to them….So if I decide to have them replace the bushings I may as well just go all the way with a replacement track bar. And if I do that what is the recommended bar for a 2 inch lift? Another thought – what if the play is due to the mount hole wallowing out? Or is that not likely?

4) U-joint vibes. So far I have had it up to 60 mph, so I haven’t seen it all just yet. Minor vibes at 30 35 mph – almost not enough to notice or concern me, but what is the limit here? How much of a vibe should be cause for concern?

Sorry for all the questions, and thanks so much for all your help…

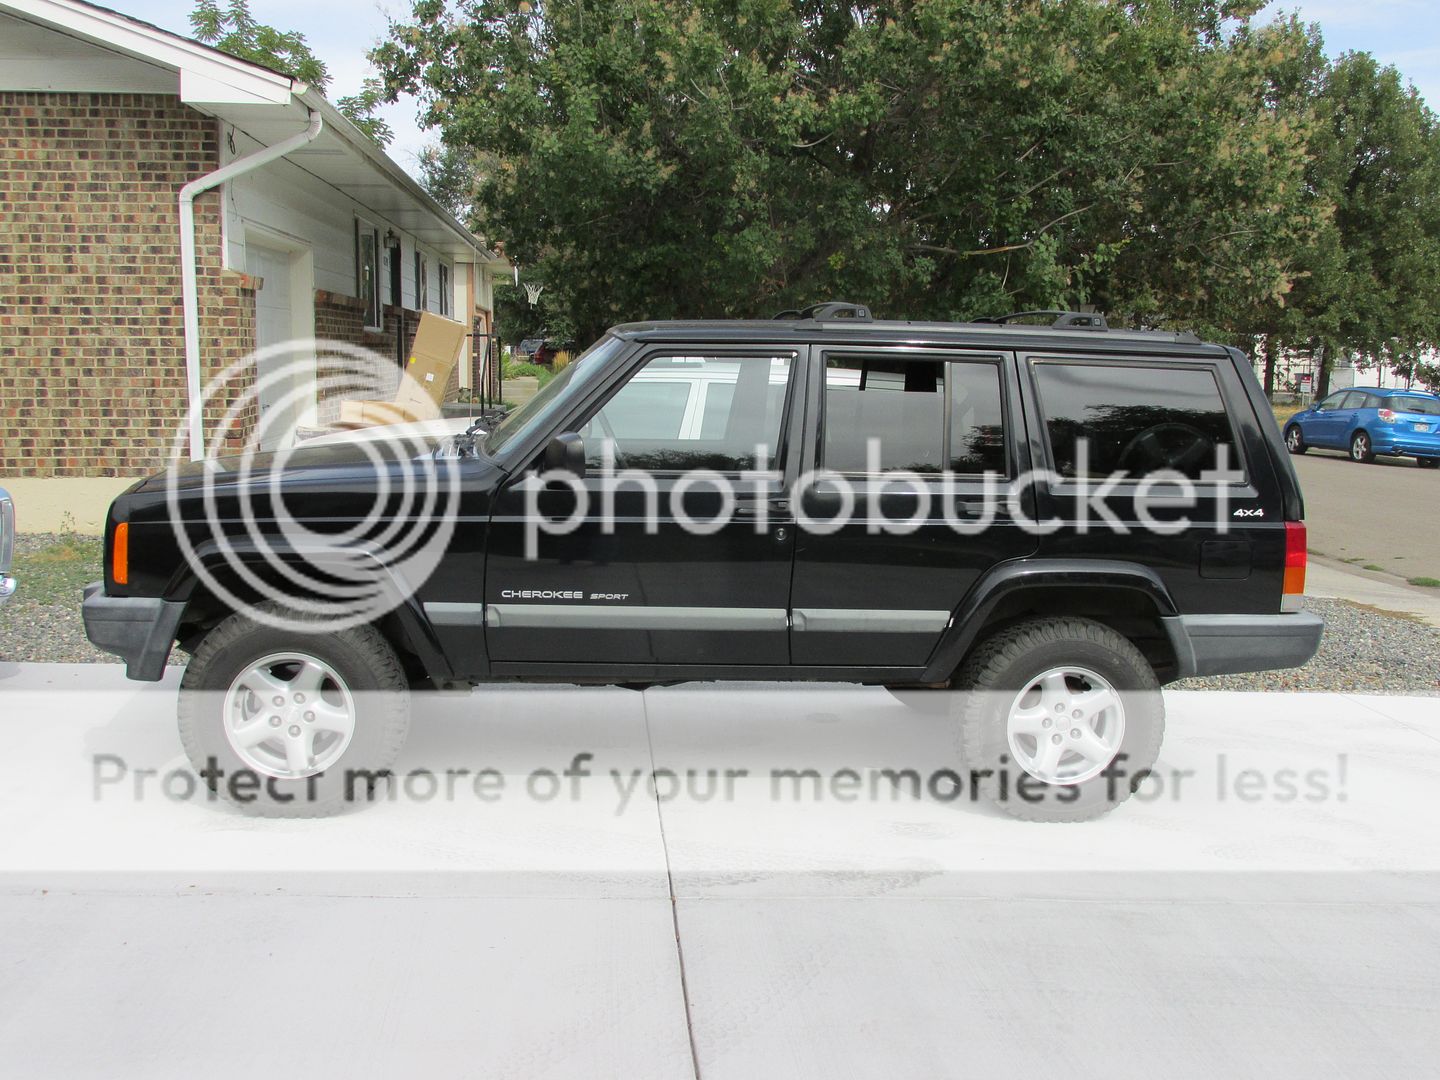
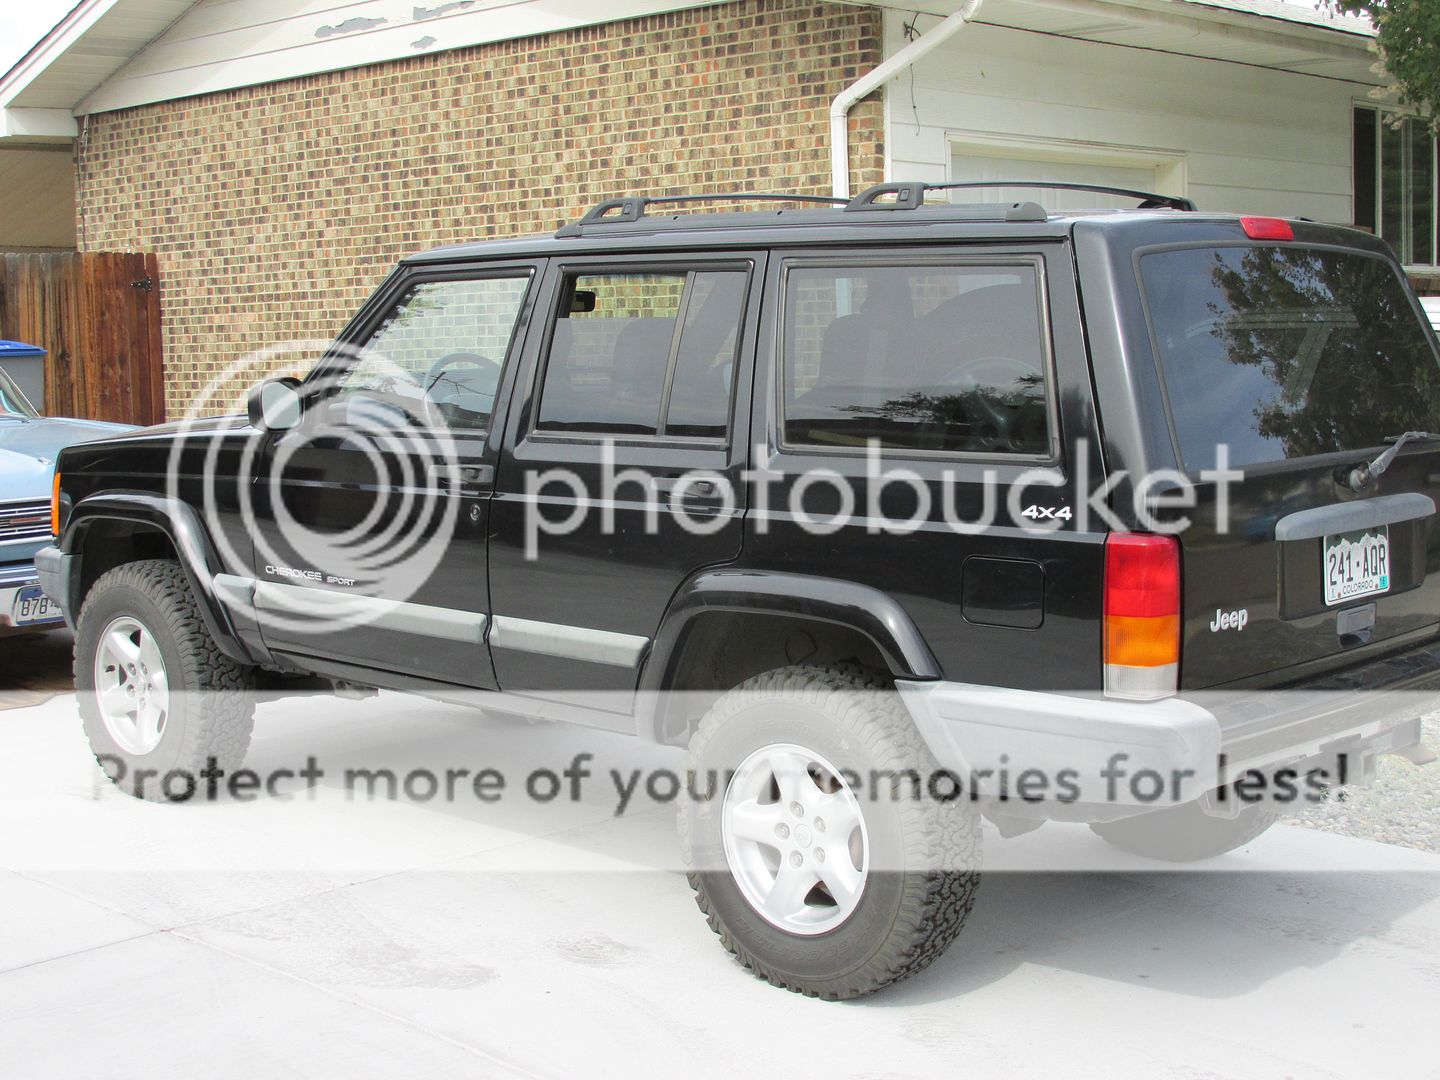
Now let me see if I can load a pic or two. Those LT235-75-15s for those that want to know.

IMG_2721_zpsbtq1pxpe.jpg


IMG_2723_zps7wjue0th.jpg
 
Back
Top