• Welcome to the new NAXJA Forum! If your password does not work, please use "Forgot your password?" link on the log-in page. Please feel free to reach out to [email protected] if we can provide any assistance.

The "Jeeper Sleeper" - XJ Camper Conversion

tV8bird

NAXJA Forum User
Location
LI, NY
Started a build today: temporary conversion of my XJ into a camper for two. The girlfriend and I will be taking a cross-country trip lasting about a month, camping and driving, on- and off-road, and staying in the Cherokee.


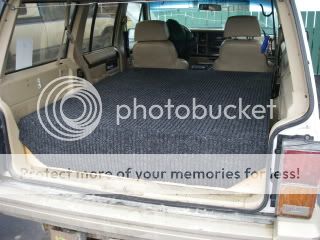
First, I removed the rear bench, bottom and backrest.

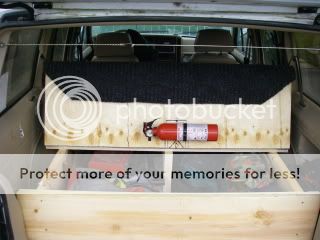
Next, I built a frame for the sleeping platform out of 2”x3" pine. Note that the passenger-side siderail is shorter; this is so that the passenger seat can be reclined when the shotgun rider wants to rest during the drive.


Then, I used my WeatherTech cargo liner as a template on 1/4" smooth underlay ply. This I cut with a handheld jigsaw.


Not pictured: I cut the ply so that I can make it open (hatch on left and a hatch on the right) to access the rear passenger footwell / jack stowage areas, which will be utilized as storage. Ultimately, there will be a shelf extending out the opening of the rear hatch, supported on cables, and enclosed in a custom-made tent. Going to add some slats out of 1"x2" for springy support under the plywood and cover it with egg-crate bedrolls or just use an air mattress (still undecided). Cheap safari rack with LED driving lights and soft rooftop carrier being added as well as interior curtains to make this more like a Mini-bago.

More pics to come. Stay tuned.
 
Last edited:
Interesting. I slept in the back of my rig for a couple wheeling trips and my only complaint was the gap left behind the front seats when you remove the rear bench. Had to stuff a couple bags in there so I could lay my head down. So it will be interesting how this turns out.
 
I'm excited about this project. Saw your East-West thread, Jeepdo; looks like we'll be on the road around the same time, so honk if you pass...:wave:

I actually expected a fair amount of ridicule for making this a temporary setup (I know most guys on this forum would laugh at my little stock "rig" since it's not lifted or modded)...before I go further with this project, here's why it's temporary:

A. I don't want it to always be a two-seater
B. I don't want it to always be a camper
C. Mine is a daily driver (so if I do lift it, it would be less than 3" on stock wheels, with the 235 A/Ts I'm currently running, just like my previous XJ, which met its fate in November)
D. I use my Jeeps mainly on-road, like commuter-cars, which sounds dumb, since the MPGs suck, but you can't beat the reliability / capability...
E. This one is a 2000 Limited, and I JUST hit 71k on it. It's in overall good shape. I figure it'd be a sin to mod it

Anyway, I know I'm not the first to do this--some people build the platform higher to put storage beneath it, and my girlfriend has been reminding me over and over that she thinks we should, but I don't want to give up the headroom. Four or five weeks in this thing may make us claustrophobic as it is. And cramps from never sitting all the way up sound like the makings for a bad trip.

A lot of people talk about using a small tent for their gear when they sleep in the truck. At that point, why not just pitch a tent to sleep in? We are going to pack light and use a soft 18 cu. ft. cargo carrier that goes on the roof at night and back in the truck during the drive (lower center of gravity and better aerodynamics); hence the basket, which should be coming soon...a 62.5"x45" rack made by Rage that I bought for a song.
 
Will do haha. We'll be on I-80 headed west aorund the 29th this month. And the jeep is nice, no one should be giving anyone crap for not lifting an XJ, especially a clean DD. If they do, who cares it's your rig do with it what makes you happy. :)
 
Looking good,
this is what I did to mine.
IMGP0885.jpg

IMGP0886.jpg


Sixer
 
We were supposed to be starting out beginning of June. Now it looks like we've pushed back our start date. It's up in the air, but you never know.

Anyway...

Big day for this project today, just not a fun one. Was hoping to get much further.

Started the day by taking down the seatbelts from their roof mounts. In the pic below you can also see that the platform is two halves; the forward half I intend to cut into a LEFT and a RIGHT so I can have two separate hatches for access to the storage below (so that if one person is laying down, the other can access the storage if needed, without disturbing the other). Dropping the seatbelts was easy. Really thought it'd take more torque to crack those bolts. The bolts will provide the anchor points for my cables (3/16" vinyl-coated steel)--they will come down to suspend the "shelf" that will extend this platform out of the rear of the truck. As for the belts themselves, they are going to be neatly tucked under this platform for the duration of the trip. I am also devising a curtain system for privacy that may rely on these seatbelt bolts as well, and possibly a cargo net (since there is no longer a backrest to prevent things from flying forward in a hard stop or crash).


I lucked out and found some scrap pieces of angle iron in the garage (through the years, we've used it on everything). They were already the right size to do what I'd wanted: utilize the factory holes and bolts that hold the rear backrest in place as anchor points for the frame of this platform. Finding these saved me a little time, which I am always thrilled with. All I had to do was re-drill the existing holes on the two scraps to accept the seat bolts. Nice fit, though, for something I didn't even make. Guess I need to get lucky somewhere...

(The angle iron brackets come up just shy of meeting the bottom of the framing. So I made up some shims of the 1/4" ply I've been working with to remedy that issue. Unfortunately, I didn't get as far with all this as I wanted to.)


...and heeeere's why: I added the slats today, and it was one of those points in the project where things are fighting you and you're running out of steam, so I lazily made my notches in the 2"x3" using the miter saw.:jester::idea:

(Yeah, I know.)


I decided that I wanted a slat at the front of the assembly (above the rear footwells), and also that I wanted to add some rigidity to the slats in the cargo area, so I devised a sort of spring system by using some scrap strips of the 1/4" ply to add support underneath the slats. Unfortunately, I'm not terribly confident in the strength of all this as I heard some disconcerting noises under my weight when I tested this. I think I will remove the strips of ply and, instead, sister on some additional 1"x3" to the existing 1"x3" slats, to make them a little beefier, but only in the middle. I still want there to be some give, so it isn't like sleeping on a rock, and I also want to keep the whole thing relatively lightweight.


At the end of the day, the whole thing looked almost the same as before, which is why today was disappointing. But I was out of time...other obligations awaited. (My photography class, if you can believe it; please excuse the crappy cell phone shots I'm posting here. It's just faster to take them that way while I'm working.)


The Rage Powersports roof rack came in the evening, leaving me only enough time to assemble the bottom portion of it before rushing off to class...it's big. Will hopefully have pics of that in the next day or so. Again, disappointed, because had it come earlier in the day, it might be on the truck already.

Thanks for looking, and I'll keep posting as I continue working on this project.
 
I'm interested to see where this goes. I've slept in the back of mine with my GF a few times now and it's not too shabby. It would be nice to build a frame to have it be a little more dedicated like this as we too are going on a 2-3 week trip to Canada.

I haven't worked out the costs yet but I'm designing a frame to hold a screen that can be rolled up in the rear windows. Summer time sleeping with no bugs! It'll be 3D printed and if I get the cost reasonable I'll offer them for sale.

3D printing?! Awesome! Y'know, I saw that some people are making a lot of their parts that way. Just imagine having perfectly made extras instantly every time you break one of those stupid, plastic interior fasteners or plastic clips for the electronics / wiring harness plugs. The possibilities are endless.

The screen should be totally doable. I had that idea, too; although, I intend to make mine out of wood with weatherstripping, about 4" and the width of the back windows. I thought it was original, but I guess a lot of us think alike. I actually saw it done in a forum post on Expedition Portal, somebody with a 4Runner, I believe.
 
Ya I bought a printer earlier this year, it's been fun. The issue is the current desktop printers you can buy are far from being economical as far as production goes. I've worked some stuff out already and it'll take about 12 hrs to print 1 window frame (About 16x14in).
I'm working on optimizing the design for printing so I may be able to shave some time off but we're talking an hour or two tops. So 20+ hrs for a set.. It's somewhat okay I guess considering I can press start, go to work, and come back to one side being done. We'll see though. I still need to finalize and work out some cost numbers.
 
Looking good,
this is what I did to mine.
IMGP0885.jpg

IMGP0886.jpg


Sixer

Thanks!

With your platform raised like that, are you comfortably able to move around? Sit up, or lean on your elbows?

She keeps nagging at me about storage, but I just don't want to give up headroom for over a month of use...
 
I'm only about 5' 10" and my feet touch the hatch when its closed. But it sounds like he's extending it beyond the hatch for sleeping.... could be wrong though
 
I'm only about 5' 10" and my feet touch the hatch when its closed. But it sounds like he's extending it beyond the hatch for sleeping.... could be wrong though

I'm 5'8" and she's 5'6", and we've slept in the back before, but it sucked. I don't know how anyone taller claims they've slept comfortably back there.

The floor is hard, too.

Yes, I'm extending it (my fault for making my posts so lengthy that no one reads the whole thing.)

I took a whole lot of pics today, and made more progress on this, and threw the safari rack on the roof; but for now, I can't post because my cell won't cooperate with the upload...more tomorrow.

Thanks for looking, keep checking back.
 
Last edited:
Yesterday's progress:

I replaced the strips of 1/4" ply with strips of 1"x2" to give my slats more support. The spring system is pretty strong, but pretty flexible, and it remains lightweight. So far I am pleased with this. (Laying down on my assembly on the garage floor was very comfortable. At one point I had a portable floor jack in the center of it with a jack stand along side it, and was driving around. No problems.)


I also took the forward portion of the 1/4" platform and cut it in two (driver's side and passenger side) to form two hatches that I can remove to access storage underneath. I added some cleats all around: ribs made of the 1"x2" that are attached to each hatch with 3/4" nails--I nailed the heck out of it--and some little cleats from scraps of the 1"x2" (mistake waste, mostly, but shhh...), and those are at all four corners of the opening below the hatches, to give the ribs something to rest on.


I did all of this while the truck was at my mechanic's getting a new driver's side U-joint, hub bearing, and track bar. So when I got the truck back, I threw everything back in to see if it fit properly, since I still have yet to secure the rearward portion of the platform top...


In other news, the safari rack was taking up too much room to leave it in the kitchen another day. So, exhausted as I was, I put it together and mounted it on the truck. The halves of the top frame and the halves of the bottom frame go together with those spring / button things that you would use on, say, telescoping legs on an easel, etc. I wasn't crazy about that. The hardware is all very poorly machined. For now, the upright bolts can stay, but those will eventually be replaced with stainless, and maybe some washers added. The U-bolt / clamp assembly is garbage, and I am replacing those before the trip. I think I will also add some extras, just to be safe. But for what I paid, I suppose I shouldn't complain, and I think it'll do its job. If anyone wants to know, the rack is made by Rage Powersports, and I bought it from someone called Discount Ramps on Amazon.


That's all for now.
 
Last edited:
Having a hard time getting anything done right now--other things have been coming up.

Should be back on it tomorrow...
 
Only had a little time yesterday, so I started getting this sucker bolted down.

I don't like drilling holes and creating potential rust problems, and the backrest bolts for the rear bench provide a good place to mount a bracket (see earlier pics).

So I drilled some 1/4" holes through my frame, one on each side. Then, I widened the top holes with a 1" speed bore. This allowed me to put a 1" fender washer within the wood, and have the end of the bolt, along with the nut, recessed in the frame and it will be under the ply that lays on the frame.

Here is a top view of the driver's side (both sides are done the same way):


Here is the view of the bracket--the black bolt is the seat bolt--from underneath:

 
Last edited:
I'm going to take a slightly critical approach to this, although I completely support your plans: You're making too much work for yourself. As someone who has spent a week or two at a time in the mountains and desert backcountry with wife and sometimes dog, I recommend overbuilding and having less "stuff".

In my opinion, and this is all it is, if you used thicker wood (2x4, 1/2' or 3/4' plywood, etc) you would be saving yourself some work. All that effort put into the slats and redoing them, when you could have just had a cleat running down each side of a 2x4, and laid [thicker] slats onto that. Use thicker wood and less of it: less shit = less stuff to break or maintain. I wonder after a month of use and weight your platform will bow. It doesn't have to be super flexy, you should have air pads/mattresses (which ever packs down more efficiently?) for that. The more it flexes, the more the wood is going to move and stress against the hardware.

forget curtains, just tint the windows. Do you really want to be messing around with something that is going to be moving around, making noise, getting in the way, and just something else that you just have to manage?

Couldn't tell too well, but you might want to consider new rear leafs or an AAL. You'll have a lot of weight back there, it might be smart to be proactive about it.

Grab an onboard power inverter, and don't forget a place for a spare- get that doughnut out of there.

I think you'll regret not making your platform higher for more storage, even by another 6". Seriously, it's not like you're trapped in there, get out and stretch, and it will make room for storage containers to organize all your junk in. If this is already a point of friction -before living in the XJ together for a month- then give your lady some more storage. It's not a bad decision, and if it makes her happier it's going to make you happier- trust me.
 
Back
Top