• Welcome to the new NAXJA Forum! If your password does not work, please use "Forgot your password?" link on the log-in page. Please feel free to reach out to [email protected] if we can provide any assistance.

99 XJ DD & Weekend Warrior

NW99XJ

NAXJA Forum User
Location
Gresham, Or.
99 DD & Weekend Warrior

I have this build on another site, and figured I'd make a copy of it here as well, as this community is more Cherokee Specific.
I've started this thread to document and share the build process of my first Cherokee. A 1999 Sport. 4.0L I6, AW4, NP242, HP D30/C8.25
I have lots of plans for it, but for now here is the way I got it - back in Feb of 2010.
Picked it up bone stock. I'm the 3rd owner.


With a lovely 1" sag in the rear.


First up was a couple of quick essentials:
Came across some killer deals I couldn't pass up, so I figured I might as well add some goodies: Cobra 19DX IV -from Craigslist


Got a deal on a K40 4ft 2kw tunable fiberglass antenna from the same guy.
...with a trip to Radio Shack, and a few things from the Auto Parts Store:


And..... A Yakima Warrior Rack for dirrrt cheap.
$175 with mounts and wind dam!


(yes... at the time I was living in an apartment complex:mad: )

 
Last edited:
Sweet rig. Welcome to NAXJA.
 
MARCH 2010:
Well after weeks of driving around with a god awful clatter and *thunking* sound coming from the back end, I finally had a friend help me track down the exact source of the noise. Turned out to be my right rear shock. Totally blown, and in dire need of replacement.

I had originally thought it was the rear lift gate, and after buying new bumpstops at the stealership, and installing those, the noise was still there. In fact it just got worse over the next couple weeks. Well I had been shopping around for lifts, and i knew i was going to end up with a 3.5" with full leaf packs and of course new shocks all around. But i had been waiting on a couple pay checks, and a tax return to make it happen. In the mean time, and more for safety's sake and my own peace of mind than anything, i decided to just swap out the old OEM shocks for something of equal value, ($24ea at Nappa.) I also knew I was going to throw in some Bar Pin Eliminators at the same time, so I picked up some JKS Rear Upper BPE's from one of my local 4WD shops- Central 4WD. Got 'em for $40 out the door!


Below I'll detail how it all went.
>
So I began the install around 2:30, 2 days of PB Blasting everything to hopefully avoid the dreaded rear upper shock bolts breaking. FAT CHANCE!!!! ALL FOUR snapped right off. Lowers came off no problem, but I know there was a good chance the uppers were going to snap, and shure enuff, they all did. Luckily I did my homework and read a thread on how to circumvent this issue. I simply drilled out the old bolts - had to use a good high speed carbide drill bit - and knock out the old welded nuts on the chassis.

Easy enuff, just took alot of elbow grease and a good corded drill to get thru the bolts, and a hammer and punch did the rest.

Here's a shot of the old shocks compared to the new ones. Nothing special, but as you can see the OEM's were just toast.

Once I got the old ones out and the holes drilled, it was off to the parts store to get the RIGHT hardware. I had originally picked up some 7/16" grade 8 bolts, but those were WAY too fat to fit in thru the JKS BPE's. Ended up going with 5/16"x2" grade 8, a larger washer on top to keep the head from coming thru the holes I drilled, then a smaller washer and a lock washer for the bottom side of the BPE's. Got back and started to set everything up.
The trick to getting the new bolts thru the drilled holes is to use a length of thin wire to fish them thru the triangular access holes that are directly in front of the shock locations. Not alot of room but its not that far to fish. Just make sure the wire is wrapped around the bottom of the bolts real good.
It's actually pretty easy to do. Here's a shot of one done already and me fishing the second one thru:

And VOILA!! -out comes the bolt.

Once that was done, it was time to extract the bar pins from the new shocks, WHAT A PAIN IN THE A**!!!
But a little more PB Blaster, some vice work, and a good pickle fork used for ball joints and they came out:

Once those were out it was time to got the BPE's on them. That went fairly smooth. Just lubed up the shaft (lol), stuck the base in the vice, and while rotating the shock back & forth with one hand I pressed down with the other to get it to seat. Then simply placed the other end of the BPE on and used the vice to clamp them down, then hammered down the set pin. TA-DA!!!

....yes I know the holes are 90deg from where they should be, but that was easily remedied.
Once the shocks were ready, they simply slipped over the bolts that were hanging thru the holes, I placed the lower end over the bottom mount, that kept the whole assembly in place while i put on the washers and the nuts. Tightening them down requires you to get an open ended wrench in thru that triangular opening to keep the bolt from spinning. Not as necessary as it sounds. Didnt need to do it on a couple of them. Torqued it all down real good. And I WAS DONE!!!! ----only FIVE HOURS LATER!

Another shot of the shocks installed with the JKS Bar Pin Eliminators:

I highly recommend this method for anyone installing rear shocks and end up snapping bolts. Don't be a idiot and start cutting up the floor of your jeep to try to do this form the top. The most difficult part was the drilling. But with the right tools, and enough preparation this isn't that bad of a job. And it was all ready to go when I finally ordered my lift kit with new shocks. I will document that process as well.
 
Last edited:
MARCH 2012:
Next up was to make sure some of the mechanical was all in order. A Full Tune-up was done. I had been keeping real good track of the MPG's and i was averaging a solid 15-16 mpg. The best i had was a touch over 18. I know these things arent the most fuel economic vehicle out there, but i know there was 2-4 mpg i could squeek out of it. I also knew that my down stream (after the cat) O2 sensor was bad thanks to a trip to the mechanics shop for a full "used vehicle inspection." So after a trip down to the parts store here's what I decided to do, plugs, cap, rotor, O2 sensor, and a new high flow air filter.

I decided to do a modification to my stock air box, as I didnt want to fork out the bucks for a full intake system that gives you the protection from both heat, and water. Keeping the stock air box and dropping in a good high flow, gives about the same results as a aftermarket system.
Here's how that all went:
First you remove the blow by tube, and the intake tube form the air box, removing the air filter, leaves you this:

There's two mounts that hold this in place, the one towards the rear is on a stud, while the one towards the front bolts thru the box to a welded nut on the body. I PB blasted them before hand, and let it soak for about 30mins before proceeding. Of course in true Jeep fashion, the front bolt broke off on me:

No worries, on to the next steps..... The factory air box has a small, flanged intake port. This restricts the airflow into the intake, and can easily be modified. Now this CAN be done IN the vehicle, but it is far easier taking it out, and i'll show you why later.
This shows the factory opening in the air box. (i had aleady made most of the cuts, in this pic):

After the cutting is done: (note: all i used was a jig saw to make the cuts, a saw blade, hot knife, or sawzall could be used to do this as well.)

This shows after the cut, the difference between the stock opening, and the modified one as you can see, this will allow a much greater mass of air to be drawn in, while still keeping the filter out of the elements:

Next I de-burred the edges with a file, and smoothed all the cuts, rounding them off, leaving no restrictions for airflow.


After modifications are done, reinstall the air box. With one of my bolts broken, the only factory mounting point was the rear stud. There is however (on my 99) a small hole (aprox 1/8" in the bottom towards the front,) which I used as a guide to drill a pilot hole in the body for a new screw to secure the front half of the air box. You'll see the shiny #10 x 1/2" steel screw in this pic that was used.

Only thing left to do is drop in the new air filter and button it all up.


Next it was on to the tune up, the plugs were definitely shot:

And the cap was toast too. Note the build up on the contact points, obviously this would prevent good electrical conductivity, and create a weak spark. Now the engine wasn't running rough before, but it certainly lacked pep, and the mpg's were showing sign of ineffeciency.

Now I know i could have just scraped the contacts, and sanded the rotor down to shiny metal and called it good. But to me thats just a band aid.

Next was on to the O2 sensor, let first say that was a PITA to get out. It was rusty, and might as well have been welded in. It was probably the OEM unit, and had never been replaced. I soaked it with PB Blaster several times for at least 1.5 hours before hand. Finally came out and here's the comparison between the old (left) and the new (right)

The new sensor had a much longer wire harness, and after installed it was obvious that there was potential for failure, as the harness was lying on the drive line:

So using the factory plastic connector shield (black plastic assembly in photo) I noticed a spot where there was room for a zip-tie to be placed tying up the harness out of the way.

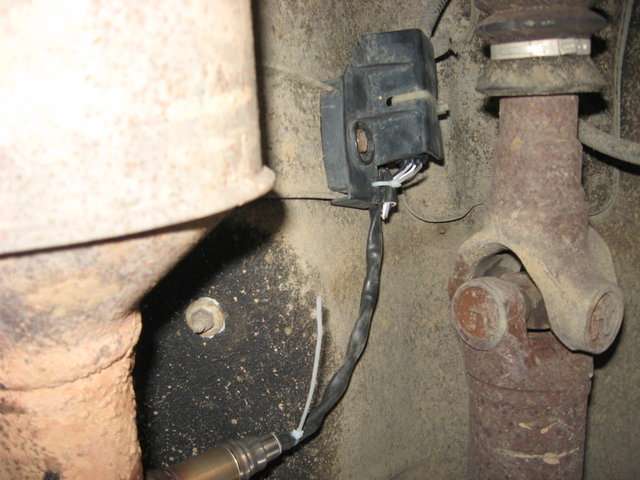
Note the small rectangular opening towards the bottom of the plastic housing at the bottom of the pic:
(also, this housing must be removed in order to disconnect the old sensor and plug in the new one, only one bolt holds it in place, and strangely enough, came out quite easily)


Thats pretty much it. I had in the beginning removed the positive battery terminal, and after a few minutes, held it ground briefly to discharge the computer's memory. This caused some rough idling and acceleration upon restart after the job was completed, but smoothed out after a full heat cycle, and a 30 min drive. Even after that, I could tell the computer was still "learning" and will eventually smooth out completely with more driving.
Towards the end of the drive it was very clear that the engine was running ALOT better, and acceleration had improved as well.
Hope this shows you how an afternoon, and a few things form the parts store can not only improve efficiency, but also give you a little increase in performance.
 
Last edited:
In March of 2010 I bought the lift kit, but at the time I was living in an apartment complex, and it took a while to get the time (and for the weather to cooperate) and place to do the install. Here's a pic of the all the parts (minus the full leaf pack) as it sat in my living room before the install.

LIFT KIT INSTALL - PHASE-1 - MAY 2010
3" ProComp Kit with full leaf packs (rubber bushings and 4 degree shims installed already), New U-bolts, 3" coils, front brake line relocation tabs/brackets, new lower control arms, sway bar drop brackets, and new sway bar links, track bar relocation bracket, Pro Comp ES3000 shocks, shock boots, and JKS front lower bar pin eliminators. (already have the rears installed.)


So now that we're all up to speed, here's how the install went.
Backed it in, and started in on the rear. I knew this was going to be the most difficult, and had the possibility of presenting the most issues.


With the rear end jacked up and on stands, the rear wheels came off and I dove right in.


Many weeks of PB Blasting had been done. In the last 6-8 weeks alone I've gone thru 2 full cans, and during the install, went thru 1/2 of another can.
Fist to come out was the rear sway bar. Three bolts of the four came out with no issue at all. But in true Jeep fashion, one of the weld-nuts decided to break off in the frame rail. So with a quick trip to Harbor Freight for a cheapo 4.5" angle grinder, It got cut off.


And out it came. Wont be needing this any more! :cool:


Next up was the front leaf spring mounts. I've read several posts where these have been touted as one of the worst parts of a lift install on an XJ.
After some close inspection, I found this little hole just to the inside of the mount.


If you spray inside at the right angle, you can get right to the threads of the bolt sticking thru the weld-nut. A straw would be awesome on the end of the spray nozzle, but PB Blaster has a pretty good stream so it wasnt too hard, just dont be shy with the lube. SOAK IT. If you get the right angle (see arrow) you can hit it pretty good. I did this for weeks before the install.


This proved to work well, as the first - front leaf spring bolt came out with out too much difficulty. I did have a 3/4" 2ft breaker bar, and I torched the bolt too, just to be safe. Last thing I wanted was to break one of those weld-nuts.


I can't explain just how "crunchy" and nasty this was and how absolutely CAKED with rust this bolt/weld-nut were. This pic just barely shows how much crap is built up inside these.
 
Last edited:
The driver's side front leaf spring bolt was a whole nother story. This didnt want to budge. So i sprayed, and torched......


....sprayed, and torched some more, and after putting all I had into it.....


It finally broke free. Creaks, and cracks, and the most gawd awful "wet sand" noise every time I got a turn out of it. It came out about an inch.... then stopped. A typical issue from what i've read on Jeep Forum. Here's the arsenal of tools required to do this part of it:


If this ever happens to you.... take my advice and dont just keep turning. I did that while getting on it with a pickle fork, trying to pry it out as i turned. It didnt work. After a whole lot of torching, and prying the leaf spring eye to one side as much as possible, i was able to get a set of vice grips onto the collar/sleeve/tube thing that goes thru the center of the bushing. The bolt rusts/fuses with this, and wont back out. There's enough bite on the threads of the weld nut to push it thru part of the way, but after that your SOL. If you just keep turning, and dont stop that sleeve from spinning inside the bushing, this will happen:


The threads stripped out from the bolt just spinning against them and not backing out. There was maybe 2 or 3 good threads at the very end of it. I tried chasing the threads with the new bolts, but no luck.

The rears came out pretty easy. Lost of pre-spraying did the trick. That and the right tools really help. Quite rusty, and definitely due for a swap.


Once the whole spring was out I got a better look at the old. Here's a close up of the front eye. I have some choice words for this s.o.b.


Speaking of swap. Here's the new shiny that will be replacing the old rusty junk hardware. THANK YOU JACK-IT!!! ---> Suspension lift kits, body lifts, leveling kits, shocks and other 4x4 products - Jackit.com
 
Here's the old vs. the new leaf springs. Nice arch on the new, flatness-saggy-worthlessness on the the old. I'm SO GLAD I went with a full pack over an AAL. An Add A Leaf simply wouldnt have given me the net gain of lift I got form a full leaf pack, and would have just sagged over a short period of time.


So after the old leaf springs were out, it was time to tackle the repair of the stripped out drivers side front leaf spring weld nut. Here's what was required:

A 12" x 1/2" drill bit. This is long enough to reach all the way through with out any interference. This bit will ream the hole to the appropriate size in order to install a Heli-Coil. A Uni-Bit to enlarge the outer hole enabling you to clear a socket to hold the tap tool. A 14-2.0 tap tool, and the smallest possible socket to capture the end of it. You wont have room for a typical "T" style tap handle. A 14-2 Heli-Coil Kit - includes the previously mentioned tap tool, coils, and coil install tool. (be prepared, this kit cast nearly $80). And of course a NEW bolt to install/check afterwards. Dont even THINK of using the old hardware.
Here's the outer hole only SLIGHTLY reamed out larger for tool clearance.


The process of tapping the old, reamed out weld-nut, is very tough. This is at least grade-5 type hardware. The tap is tough enough for the job, but you'll want to tackle the first part of this with a drill. Doing this by hand would take forever, and most likely give poor results. There will come a point when the drill just wont have the torque to finish the job. Thats why I went with the socket method. This enabled me to finish the job with good results. Its always a good idea to clear out the chip load (shaved metal) and lube often. This will make things easier and give better results. Once your drilled, and tapped, you'll thread in the Heli-Coil just past flush with the frame rail. Because of the intensity of this whole repair, I neglected to take a few, "mid-way" pics. But here's the finished product:


Now that the weld-nut is repaired, its time to get the new leaf springs in and move on. I recommend installing the front of the leaf spring first. This will prove to make things easier in the long run. Installing leaf spring by yourself can be difficult, but with the right tools/technique, it can be a breeze. You'll need a bottle jack, a floor jack, and a pry bar. This will give you 3 axis' of control to line up the bushing eye with the shackle. By this time the rear axle is only connected by the drive shaft, and brake line, everything else is disconnected, but the axle is still supported by a floor jack under the differential. this will enable you to manipulate the axle easily to give yourself as much room as possible to fit parts, and for working room. Having the axle as low as possible will make it easy to fit the new springs in. Once the front is in, (sorry no pic) loosely install the new U-bolts, and move on to the rear. The bottle jack will go on top of the spring and press against the top/back of the wheel well. Dont worry, there's not a lot of force being applied here, your not going to dent anything.


Extending the bottle jack will control the forward/backward axis of the spring.
The floor jack (placed under the axle tube on the side your working on) will control the upward/downward axis of the spring.


The last control factor is the use of a pry bar against the shackle. This will (of course) move the shackle into a position where you can slip (maybe hammer) the new leaf spring eye bolt thru.


Since the jacks work independently, and can be adjusted then left alone without having to hold them, you have one hand free for the pry bar, and one hand free to install the bolt.


Next is the shocks. Since I've already done this once, it went super smooth. Bar pin eliminators FTW!!! Here's the old (blue) and the new (white).


After this, it was just a matter of throwing on the 1.25" Hub Centric Wheel Spacers. I got these off of Craigslist, one of those deals I couldnt pass up. For the price of 1 to 2 wheels, i got wheel spacers that simulate roughly 4" of back spacing on my stock Eco-5's. Red Loctite on the threads, and torqued to 85ft lbs.


Once that was done, the wheels/tires went back on, and a quick pic was taken: HUGE difference!!!
BEFORE:

AFTER: (rear only)


So there it is!! Back half was done and a good preview of whats to come.
 
Ok, so after the rear was done, I moved right to the front end. Turned the Jeep around and started the tear down. I dont have alot of pics of this stage pf things, as I was making great progress, and got caught up in the momentum of things. It all went pretty easy. First off was the sway bars. Those came out pretty easy. Here's the old vs. the new. Beefier, taller, and hinged for a little more articulation over the stock style.


The new ones went in real easy, and look great too. I'll eventually mod them to disco in the future, but they'll be fine for now.


Yes those are the new lower control arms half installed. I forgot to take a side by side of the new and old ones. The old ones came out without too much difficulty, alot of pre spray with the PB Blaster, a breaker bar, and an electric impact wrench made fairly quick work of this process. Had to re-use the old hardware, but it cleaned up well enough, and the threads weren't in bad shape.


Greasing everything up real good helps get these in place, a dead blow rubber mallet helped when some extra persuasion was needed. After it was all done: (This pic taken a few days after install.)


Springs were next, no spring compressor was needed. These are only 3" springs, had they been like 5" or bigger, one MAY have been needed. But by this time virtually everything of the old suspension was off already. Shocks were out, the lower control arms had not yet been bolted to the axle, and the sway bars hadnt been tightened up yet. So the axle was easy to manipulate. Just lower it as far as it will go, (with the jeep up on stands as far as IT will go, and you'll have plenty of room.) just lower the axle on one side, lift on the other a bit, and it will pivot to the point of where you can pull the spring out (after removing the spring retainer clip first of course.)
Old vs new:


Not a huge difference in length, bu the gauge of the spring and the number of coils let you know this isnt going to sag or be as soft as the stock ones.
They went in as easy as the old ones came out, and again.... no spring compressor was needed. Just apply the same logic as before, and voila!
The shocks went in next as did the JKS Lower Bar Pin Eliminators. Easy as pie!

Wheel spacers up front too of course

(yes i cut the zip tie)


The Trac Bar Relocation Bracket was last. No amount of grease and hammering made this go in easy. Talk about a tight fit!!! Goes right in place of where the trac bar mount in its stock location. Drill a hole for a second nut and bolt (grade 8) and remount the trac bar. This took some hammering to get in as well.

(this pic taken a few days after install)


This put the steering wheel about 90degrees off from normal, but it still drove straight. I went and had it aligned a couple days later. I was told it wasnt all that far out of spec. - means i did my job right! - :thumbsup:

All said and done!!! Here it was after it was all buttoned up.
Bad angle before:


And after!


Drives straight, handles great. The new suspension is far more responsive than the beat up, blown up stock suspension. No more jarring impact when I hit a pot hole, now it absorbs just about anything. (not that i'm stump jumping or looking to hit the biggest/deepest of pot holes.) I'm really quite happy with how it turned out. All together across two days, i put in about 21 hours of labor. Air tools, a hoist/lift would have made things go alot faster.
Drive line vibes are there, not horrible, but enough to where i've ordered a Transfer Case Drop Kit. And best of all... no death wobble or bump steer.
 
So of course there were some slight drive line vibrations, So I picked up a transfer case drop kit. The vibrations were getting to me, and ignoring something like that for any extended period of time is just not a good idea. They weren't bad really, not shaking the fillings out of my skull or anything. But still something had to be done. Called around, and no body had anything in stock, everybody was a week out. And internet shipping was going to get spendy. But Mark down at Central 4WD really came thru for me. They didnt have anything on their shelves, but he knew a local install shop that did, and had one drop-shipped for me that day. THANKS MARK!! So after work Friday, went and picked up my new Skyjacker Transfer Case Drop Kit for lifts 2.5" - 4.5".


The install is pretty straight forward, however the instructions were recommending I loosen up the engine mounts, and breaking one of those bolts, or replacing a mount was just not a risk or project I was willing to deal with that weekend. So i went about dropping the transfer case cross member, 4 bolts (well 2 bolts and 2 nuts - each side has a stud that comes down, and a bolt that goes up into a weld nut.) 3 of the 4 came out no prob.
But of course, nothing is ever easy when working with Jeep hardware:


Ugh... i'm getting real tired of seeing this every time I turn a wrench on this thing:


I tried for over 5 hours to extract that damn f_cking bolt. No luck. Drilling, easy outs, 2 broken drill bits and a bunch of torching and welding experiments later, and it hadnt budged a inch. So i continued on with the install anyways. It all went in real easy (i still had to install the linkage drop bracket) and after everything else was in. It was time to WELD. I've only welded a couple times before. Nothing major. So lets hope my Farmer Jon Welds hold up.....


Yea I know, ugly as hell. But its been nearly TWO YEARS now, and everything is rock solid still.
 
September of 2010 brought some new additions:
I had been staring at a pile of parts, and finally got the time to do something about it. HOWEVER.... On my way up to my buddy's place to use his tools and driveway, (I was still in the apartment at this point) my passenger front window fell into the door. Out of nowhere! No issues before hand on this, but right before it happened i hear this loud *TICK*... and I knew instantly what had happened. The regulators on the XJ's have a slight design flaw in how the window track grabs the worm drive gear to make it go up and down; its a tinly little piece of plastic. I know there's repair kits online, i've seen 'em before, but with rain on the way, i had to do something about it right away. $120 later, and I was tearing apart the door to do the swap. New motor and regulator went in.
Here we are with the door panel off,

Easy to do, just take out all the screws, pop it loose from the door, remove the two blue plugs from the switches, and pop off these clips from the door release and lock linkage. They just rotate off. Might need to use a little force, but they DO come off, a flat head screwdriver will help with prying them loose.

Just remove all the bolts, that hold in the regulator and motor, unplug the wiring harness to the motor, and pull the whole assembly out. Here is the door all gutted. Just do the reverse to put in the new assembly. Pretty easy really. Only took about 30-45 min, if that.


Next up was the Transfer Case Drop Bracket Shift Linkage Spacer. Finally got my 4Lo back!


Installation was pretty simple, had to pull the front seat out to get to the top of the bolts that hold the bracket to the floor pan, where the pivot point is. Other than that, it went pretty quick.
Next up was the Dyno Max Cat Back Exhaust. I had Been sittin on this for a while now, so I was anxious to put it on. This too went in real easy. Out with the old, in with the new!

(Bizz the Cat decided to lend his expertise in this endeavor)

As you can see it tucked up pretty nice.


And I picked these back in June or July of 2010, couldn't pass up the deal on got on them, and they're in like new condition. They'll work out perfectly too, as I don't do a whole lot of extreme rock crawling. Couple mounts to the "frame" and five across the pinch seam. Pretty much the same as alot of other rails out there.

Looks good to me!


And here's a shot in the daylight:

Went to install a JCR "type" rear bumper I got off a guy on Craigslist too, (almost identical in every way) but I think his jig was off when he welded it together, cuz it sat about a 1/4" too high, and wouldn't let the rear hatch close. All the work to take off the factory rear bumper, get this new one mocked into position, only to find out that it doesn't fit properly. I didn't have the time or the means to fix the fab work on it to make it fit right. So I put it on the back burner for a while.
 
Last edited:
SEPTEMBER 2010
Found a killer deal on Cragslist, a Brand New ProComp Steering Stabilizer, for only 15 BUCKS! The guy even had a black shock boot to go with it. Matches my whole suspension set up in every way! (ftw) :thumbsup:
 
OCTOBER 2010:
Finally got a house, and a GARAGE...

I put in the steering stabilizer I had picked up the month previous, but I had misplaced the boot that came with it, :brickwallso I'll end up putting that on (providing I can find it.) I of course needed the Breaker bar and a generous spraying of PB Blaster.
Here is the old one sprayed and ready to be torq'd upon:


Here is the old nasty, out and the new shiny, ready to go in:


Here it is all finished up:

It was a little below 19 degrees out right now, :chilly:and I couldn't close my garage all the way, but I had to get this done tonight, cause i was heading out for a wheelin' trip the next day.
The results? MUCH BETTER! The whole range of steering (lock to lock) was much smoother. Feels more....."confident", not necessarily more responsive, but "firmer" ... if that makes sense.
 
OCTOBER 2010:
Here's the install the Jet Performance Stage-1 Chip that I got off of a guy on Craigslist. These go for over $250 new on Quadratec http://www.quadratec.com/products/17608_0111.htm ...but I got mine for ONLY $40.00!!!!!! (god I love craigslist)That was one of those deals you just CANT pass up. Its plug and play, so no real need for a big write up, but I did snap some pics anyways just to document the upgrade.
Here's the Jeep shoe-horned into my garage:


My dirty Engine Compartment showing the ECU location before the chip install:


And the Chip, along with some O-rings I picked up to make sure things stay sealed.


And here we are all installed:


I followed the install procedure listed in the PDF I got from Quadratec's website, it literally took like 10 minutes.
Hooked the battery back up, and drove it a few miles before getting on the freeway. I noticed right away by my super scientific "seat-of-the-pants-ometer" that there was a gain in the low end torque. This was further confirmed when pulling onto the freeway, the second gear power band had WAY more "oomph." This all coincides with the manufactures claims, and I feel that this was a good mod. Best gains are achieved when using higher octane fuel, and have a high flow intake, and cat-back exhaust installed. Both of which I have.
JET's dyno sheet backs up my super accurate scientific findings. The dyno tests show, on a 1999 TJ, with a 4.0L I6, and auto trans. (virtually the exact same drive train as my XJ) that there was a 12HP gain at 2500 RPM, and 10HP gain at 5k RPM, (max range) average gain of 11HP across the whole RPM range.


I'm not gonna complain about 10HP for only 40 bux! I call that a win! The Jeep tested out fine on the 10 miles or so I drove, no CEL, or red flags of any kind. If you CAN get a deal, and if you have a 99 XJ with similar mods as mine, I would recommend this upgrade to anyone. I cant speak for any other year of Cherokee, or different degree of modifications.
 
FEBRUARY 2011:
Took a couple trips up to the Tillamook State Forest (TSF) recently where they have an OHV "park" Lots of trails. Most people around here know it as Browns Camp.
Been up there many times before in other peoples rides, and several times on bikes/quads etc. Got a couple videos posted up on youtube, nothin special, kinda hard to wheel and film at the same time. Did get a couple of poser shots though-
Fairly well flexed out:


STUUUUUFFFFF'D!!!

One Dirrrty XJ taking the lead -open diffs, 235/75/15 All Terrains leading a locked up TJ on 35's ----Gotta Love It!!!

Went up again the following week, it was even wetter.


FEBRUARY 2011:
Tax returns came in and I bought some new shoes for the XJ:
I Had been doing a LOT of research over the last several months in regards to tires. I had also posted up a couple threads asking for advice on a couple of my selections, looked around the Jeep community for reviews and experiences with the tires i had settled on. And after reading well over 200 reviews (literally) across a bunch of websites, I had made the choice to get myself a set of Goodyear Wrangler Duratrac's. They're one of the most aggressive all terrains i've seen, look more like a mud terrain, and get nothing but good reviews. This rig is my daily driver, and i have a decent commute, so I had to stay somewhat tame on my tire choice. 31x10.50x15's are all i can fit for now. Haven't had a chance to break 'em in yet. But had to take a couple shots with the new rubber on right away anyways.


The front was rubbing a bit on the bumper's end caps, so I trimmed and took off the lower air dam.
I will prob have to do more, if i stuff and turn they still rub a bit..... Man I need a decent front bumper!!!!
 
FEBRUARY 2011:
Well had a short day up on the trails. New tires did amazingly well. Especially since there was several feet of snow everywhere up there. Very few of the trails had any vehicle tracks, just mostly a couple quad tracks if anything. A buddy was up there with us in his locked up TJ with 35x13.50 Toyo M/T's and couldn't get traction for nothing. Even had to winch himself at one point. I didn't get stuck once, and went everywhere i wanted to go. I HIGHLY recommend these Goodyear Wrangler Duratracs. But since I didnt want to do too much solo, I didnt get much footage or pics.
Did take a couple with my girl posing in the driver's seat though:

 
MARCH 2011:
Well as luck would have it, my JCR Nut Strips arrived today.
MY BIRTHDAY!!! My first "Jeep-ish" present, even if it is from myself, its still worth documenting:


All unwrapped:


The plan with these are to secure a trailer hitch (once I get one) and to mount up the OEM Steel Gas Tank Skid Plate I picked up off of Craigslist.
GOT IT FOR ONLY FIVE BUCKS!!! - You really cant beat that.
Here's a crappy pic of it just to show it off:


I'll need to clean it up, maybe give it a fresh coat of satin black, but it'll be a good addition as far as armor goes.
As for the trailer hitch, i can grab a class III from U-Haul, for around $130 brand new. I'm still huntin on Craigslist to score one from there as an option, but i'd almost rather go for new, and be assured its a true class III.
 
MARCH 2011:
Scored again on Craigslist!
Picked up a set of H4 housings in near mint condition. Got them for only $30!!!
As soon as I knew they were mine, I ordered my E-AutoWorks Headlight Harness.
Now all I need to do is choose a set of bulbs for these in the mean time. I'm going to hold off on installing everything until I have all parts in hand.
It should make for one stunning before/after shot.
 
MARCH 2011:
Finally received my E-AutoWorks Headlight Harness, So it was time to buy some bulbs and install my upgrades...


Upon pulling the harness out and inspecting it, i noticed something I thought might pose a problem in the future. The plug ends (connector) for the lights, were not sealed up, and the contacts, although locked into the connector body, seemed to be a bit loose, and not protected at all from possible shorts to the body, or the elements.


So i did two things: i secured the wires together with a zip tie, close to the connector body, and then wrapped the whole thing in electrical tape, sealing off the exposed portion of the connector.


I did the same thing to the one factory harness plug that wouldn't be connected to the new harness. (the harness uses only on of the plugs for a signal to trigger the relays.)


After that I routed the harness, i decided to go under the radiator vs. over the top, because it seemed easier to get the ends up thru the various cavities and openings than to do it from the top. I didn't get any pictures of this part of it all, but the main part of the harness went thru the opening in the fender just to the side of the battery and got routed down behind the passenger side light then into the space behind the bumper, under the radiator. One plug (on the longest part of the harness) goes to the driver's side, and two plugs go to the passenger side. One for the new light and one to plug into the old factory harness end to use as a trigger source. Here we see the the two harness' plugged into one another, and the one new pigtail for the new light:


I didn't get any pics of the electrical connections at the battery, as that's pretty self explanatory. I did however fuse the positive side of the harness as a safety precaution, it does NOT come fused from E-AutoWorks.
Next up was to install the bulbs into the new housings. I went with PIAA'S "Intense White" H4's (p/n: 10904) http://www.piaa.com/Bulbs/Bulbs-H4.html rated at 60/55w but have the output of 135/125w at 4100k in the color spectrum. I went with these because of their output, reviews, reputation, and the fact that they don't have ANY hint of blue in the light.
(I cant stand the douche-bags with purple headlights)


Easy enough to put into the housings, REMEMBER: DONT TOUCH THE BULB GLASS!!
First I needed to pull off the rubber "doughnut" seal on the back:


Then just flipped back the lock spring on the housing, and line the bulb's three tabs up with the corresponding indents in the housing for proper alignment, and ensure they're seated securely:


Replace the rubber doughnut seal making sure its tight up against the back of the housing:


And these are ready to go in:


The difference was huge! The beam pattern is quite different, not to mention the amount and color of light that comes out.
Old:


New:


And here's a shot of the beam difference, (note; Left is old, Right is new, and the old one was only held in by one screw so it appears to be a bit high:


The brights... well lets just say you could probably see them from space.This is by far one of the best mods i've done so far. I HIGHLY recommend that ANYone with a Cherokee do this as soon as possible.
 
Back
Top